Monday, April 22, 2013

Wedding Name Place Cards

Depending on what type of reception you have you may need to create place cards.  Cocktail wedding reception's allow your guests to mingle, whereas the formal dinner wedding receptions require some type of seating chart.  So if you choose a dinner wedding reception...you must decide 'How will our guests know where to sit!?'

We had our reception at The Columbia Station so we heard about people doing 'train tickets' as their place cards.  We wanted to do something different, none of this been there, done that.  Plus, place cards and table names are the perfect way to incorporate your theme.  Our theme was based on swimming and our colors: blue & silver.

My mom and I racked our brains thinking of everything swimming related.  After hours of searching pinterest and the Internet, it came to us.  The light bulb had gone off.  Award Ribbons!   Every swimmer that has ever swam in a race has received a 1st place award ribbon, 2nd place award ribbon, etc.  We ordered personalized ribbons from Staats Awards online.   On the back of the ribbon we filled out the guest's name with their table.  Our tables were named after swimming events.  Such as 400 Free Relay or 100 Butterfly.

When planning your place cards you have to consider:
*How easy they are to find.  You don't want the cocktail hour to go by and your guests scrambling to figure out where they are supposed to sit at dinner.
*How easy they are to read.  You don't want Aunt Penny bending over the table with her glasses for 10 minutes.
*How easy are they to hold during cocktail hour.  Picture yourself at the last wedding you went to: holding the card/present, a drink (or 2!), your purse or clutch and appetizers!

*We put the place cards in alphabetical order.
*We made sure to print everyone's names in a large size.
*The ribbon had a little string that people could slip on their finger..problem solved!

Here are some pictures of the ribbons and how we displayed them:

The fold screen is from my parents house.  We tied silver string from side to side and used miniature clothespins (spray painted silver) to pin the ribbons on. 


On the left we had signs simplifying the process even more! It's all about making sure the guests have a good time.  The quicker it is to find their place card, the faster they can get to the bar ;)


Monday, April 1, 2013

Invitations

Every wedding guest sees your invitation.  The invitation gives your guests an overall idea of your colors, how formal an event it will be, who is putting it on, etc.

        Things to include on and in your invitation:
            Who is hosting: the first names your guests see are those that are paying for the event.
             The Request: 'request the honour of your presence'
             The happy couples names
             Date and Time
             Location
             RSVP: the favor of a reply is requested by (date) **make sure you give
             yourself enough time to send out B list invitations and at least 2-3 weeksbefore
             the wedding so you can get the final list to the caterer

  *Ceremony Invitation, Reception Card, Directions and Maps, Accommodation Cards, Website

You can get your wedding invitations from a printer, website or buy a kit from a craft store.  We decided to use Minted.  They have a wide variety of designs and were high in quality.  Unfortunately when we got out invitations the print was so tiny you needed a magnifier to see it and were the wrong color! Luckily minted had wonderful customer service and re-sent the invitations in a larger font and in the correct color for free! 

     You never know until you ask. Ask for free samples, ask for a lower price, just ask..
Add a stamp for a personalized touch!
Next.. you have to work on the presentation.  Believe it or not, my parents and I assembled and re-assembled the invitations like 10x ..asking "how does this look & what will people think?"  We stamped the envelope liner in a silver "all you need is love" stamp for a personal touch.  *At the wedding we had cocktail napkins that said "all you need is love" and cut our cake to the song by The Beatles.*
Our DIY part of the invitations was addressing all the envelopes by hand using a lightbox.  
Use a Light Box to trace addresses
&
Do your Own Calligraphy


We printed all of the names and addresses from Microsoft Word in Lucida Calligraphy font.  Then used the lightbox to trace the information onto the envelopes using a thin calligraphy marker.  They took a lot of time and patience, but looked amazing! 


 Final touch was a silver heart envelope seal from Michaels.
We used the white rose for our stamps.  One thing to keep in mind is how heavy your invitations are.  Take a finished invitation to the post office to have them weight it; ensuring you will use the correct amount of postage.  You would hate to send out your invitations, just for them to be returned!  The post office has tons of designs for stamps, but don't always carry 100 at a time.  So go 2 weeks ahead just in case they have to order more for you.


Monday, February 18, 2013

Hair & Makeup

That's right! Something you do everyday takes thought and planning for your wedding!  Some brides think they will save money by doing their own hair and make-up, but my advice is to pamper yourself! A professional uses quality makeup that will last a long time and look great in pictures.  The professional makeup artist can turn that 'everyday look' into 'beautiful blushing bride!' 

Now you may find yourself asking "How do I choose a salon?"  Back in high school I went a friend's prom and got my hair done at Hair Cuttery.  The "professional" (literally doing air quotes) did not know what she was doing.... after giving her several suggestions I just took over and pinned it back myself.  This is not the experience you want to have the day of your wedding.  So talk to friends and family for suggestions on professional salons, then do your research.  What do their reviews look like, how close are they to where you will be getting ready/ceremony site, what are their prices.  They might not have all this listed on their website so contact someone.  Try and get this done 6 months ahead of time.  If you are having all the bridesmaids and mothers get their hair done the salon will need several stylists.

Once you have the salon booked set up a hair and makeup trial 2 weeks-2 months ahead of time (the salon will let you know their protocol.)

Now comes the fun part!  Find several pictures of hair and makeup styles you like.  Pictures are very helpful since most stylists don't know you personally.  When you go to your trial bring a bridesmaid!  This is perfect way to include your bridal party and it gives you support and feedback.  Make sure you are honest with your stylist.  Some things to keep in mind during and after your trial: How long did it take, how long does the make up stay on, how durable aka dance proof is your hair.  Remember you will be getting your hair and makeup done 2-5 hours before your ceremony and it will have to last until the end of the reception.

Don't forget to bring any hair pieces and/or veil to the trial and have a designated person (usually your M.O.H.) learn how to properally take out your veil.


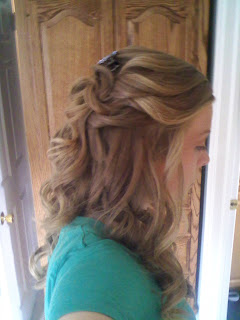
Here are some pictures I brought with me to the trial & day of the wedding


Here are some pictures from my trial


 A great picture of the back of my hair demonstrating how 'danceable' it is!

Good luck in your salon search!! I highly recommend Balance Hair Spa if you live in Chester County, PA.

Wednesday, February 13, 2013

Wedding Favor

A wedding favor is a creative and thoughtful thing to give your guests.  When picking my favor I thought how can I tie it into my theme?  But I knew my guests wouldn't want a swimming cap that says "Amanda and Matt 4 Ever".  I think if you are going to put the time and effort into making something, as well as the $$$, it should be something your guests are going to use.  What better gift than alcohol!?  Matt and I headed down to Total Wine in Delaware and were in search of something good, but not too pricey.  We found Cruse Blanc De Sparkling Champagne. 

I added a cute saying on craft paper with ribbon from Michaels:
"Tomorrow we will sail off on a cruise as husband and wife. Please have a “cruse” of your own as a token of our appreciation for sharing our special day."

How to hand out the favor took some thought.  I didn't want to have the champagne on the guests table because I thought it would be too bulky.  I also didn't want the favor out at the beginning of the night because I was afraid guests would stash the gift under their table and forget about it.  When we met with the catering company at a finals meeting they suggested setting up the champagne bottles on a table in the lobby towards the end of the night.  The DJ made an announcement to take 1 bottle and there was also a sign on the table.  It worked out and we got so many compliments weeks after the wedding about what a wonderful favor it was!

DIY Ivy Pot


One thing I learned throughout the wedding planning process is even if the vendor (florist, photograher, etc.) doesn't work out you can still learn something during the meeting.  I got a great idea from a florist to fill the tall church window sills with ivy pots. 

 DIY has a whole new meaning after planning my wedding!

I went shopping with my mom for ivy pots for the church window sills and they were so pricey! About 10-20$ each, which added up with 10 church window sills.

DIY Ivy Pot

Step 1:  Purchased 5 inch clay pots, light green Apple Barrel paint and a paint brush from Michael's Craft Store a.  
Step 2: Paint the pots lightly.  One paint stroke should do, especially if you want the washed antique look.  
Step 3: Once the pots have dried, glue diamond rhinestones from Koyal Wholesale near the top of the pot.
 Step 4:  Buy soil and Ivy.  
I bought some ivy from Pickering Valley Feed and Farm in Lionville, PA (you can buy ivy at any garden store).  
Step 5: Plant the Ivy.  You don't need too much in each pot, it will grow and spread.
Step 6: Care for your ivy!! Water them 2-4 x a week.
Step 7: Add embellishments.  
When we were decorating the church the day before the wedding my sister and grandma added some crystal leaves purchased from Koyal Wholesale to jazz them up a bit!  They look so pretty!

DIY Ivy Pot


Bridal Party Schedule

So you chose your bridal party for a reason!  Your brothers, sisters, cousins, best friends.. they are people you love, trust and will be there to support you on your BIG day.  You want your wedding day to be perfect, therefore you have to plan everything to a T.  I decided to write out a schedule for the weekend and email my bridal party ahead of time.  This gave them a heads up of what to expect.  Some of your bridal party members may have gone to weddings as guests, but have never been in a wedding.  Giving them a schedule ahead of time will also allow them to plan their weekend.  It is your wedding, but you want them to have a good time too!
Bridal Party Schedule

Groomsmen- Pick up Tux at Mens Wearhouse between today and Friday (try on at store to make sure it fits)

Friday August 24, 2012

6:30PM Rehearsal at Fairview Presbyterian Church: 800 Fairview Road Glenmoore, PA 19343  **Please do not be late**

~7:00PM Rehearsal Dinner at Springton Manor House: 860 Springton Road Glenmoore, PA 19343

Saturday August 25, 2012

Bridesmaids-

Get dropped off at Bride’s parents house at 10:00am or  get dropped off at Balance hair spa  at 10:30am (826 North Pottstown Pike Exton, PA 19341- across from Inn at Chester Springs & starbucks/next to Sunoco Gas Station) **Remember to bring CC/Cash or Check: Formal styling $65. A wash and blow dry $25. Make up application $45.

12:45-1:00 Head back to Bride’s Parents house to eat a light lunch.

1:30 Get Dressed/take getting ready pictures.

2:15 Get in limo and go to the church

Groomsmen-

2:30PM Show up at church- DRESSED in tux and ready to go! Get boutonniere at church and go upstairs to sanctuary area to usher.

3:00PM Ceremony Begins

3:40-4:00 Bride/Groom are dismissing guests from pews

4:00 Family pictures outside of church on lawn/in barn

4:25 Bridal party gets in limo and heads to Springton Manor Park for pictures

5:15 Leave park and take limo to Columbia Station

6:00 Arrive- Bridal party goes to caboose for a quick champagne toast

6:00-7:00 Cocktail Hour

6:50- Gather Bridal Party

7:00 Bridal Party gets announced to “we go together”

7:05 Bride/Groom First Dance followed by Best Man and Matron of Honor Toasts

7:10ish Dinner.. After dinner will be F/D and M/S dances and cake cutting. After cake cutting- please help us get the dancing started!!

Cake Topper

When I think of a cake topper I picture a traditional bride and groom kissing.  These days there are so many options.  You can go simple, creative, big or small.  There are so many choices including fresh flowers, a monogram, family heirloom, fresh fruit, bell topper, a photo, figurine or a clay cake topper.  This is another decision you have to make by asking yourself: How much do I want to spend? Do I want it to be a keepsake? How big is the cake- how big should the cake topper be?

I searched online for a long time looking for a swimming themed cake topper (Since we met swimming our wedding theme was a touch of swimming with blue and silver).  Go figure there were so many sports cake toppers, but NO swimming toppers.  I went to Etsy and looked for a person that could design and make a customized swimming themed cake topper.  Luckily someone agreed to make it, but she took 2 months and it arrived a day before the wedding (talk about stressful!) So my advice is tell the person who is making your cake topper a date 1-2 weeks before your actual wedding.  The cake topper was about $100, which seemed like a lot, but it is an piece I can keep forever.

Swimming Cake Topper:
Each holding towels with our college colors, goggles in bride's hand and goggles on groom's head.